Showing posts with label dude. Show all posts

Monday, September 19, 2016

Smile for Jamie


On Saturday, myself and many others said goodbye to a good friend and a great human being. It was a difficult day for us all, and I reached out to some of those who were closest to Jamie and invited them over for brunch. I am not going to make this a long post about food, but a simple quick post with a link for the recipe. I did change it a little bit - substituting regular onion for the green onion and poblano peppers for the mushrooms, but otherwise made it pretty much how it says in the recipe.

You can link to the recipe HERE.

Jamie will be remembered for many things, but one of those things was his smile and contagious happiness. He had the ability to bring the mood in the room up with a smile or a witty comment that few people have. I am not able to lighten a mood with my own smile, but I try to do it through my cooking and my food when I am able. So for me - to be able to put a smile on those whom I spent a few hours with eating with and spending time with - was my own way to remember him. I hope he would have enjoyed my food - I know he enjoyed our smiles.

#SmileforJamie

Saturday, September 3, 2016

I made a pie!

Recent events in our house have made it difficult for me to keep up with the blog, and I apologize for that to you all. Mostly what is going on is that - for lack of subtlety - is that things are pretty tight around here right now. I don't have the flexibility to experiment with ingredients like I really want to, and cooking the same things night after night makes for some pretty bland blogging. Thankfully I recently had the cause and the ability to break out of this banal cycle for a night and make something that I felt was truly worth writing about.

One of the things that ALWAYS goes over well in this house is pie. Any kind of pie will work, but the three main kinds that really get people excited are Key Lime Pie, Pumpkin Pie, and Apple Pie. It's not quite pumpkin pie season yet, and Key Lime was not on my radar, but we had a glut of apples kicking around the house and a few were starting to look a little peaky, so I decided to use them all up in one fell swoop. 

I ended up with a mix of apples for the pie, and it seemed to work out pretty well that way. I used some Golden Delicious, a Gala, and rounded it out with some Granny Smiths. I made the pie crust myself using a blend of whole wheat flour and white flour, and outside of that I pretty much followed THIS RECIPE exactly. I did end up using my white sugar and molasses trick for the brown sugar in the topping, but as with my other brown sugar substitutions you couldn't tell at all. As for the taste, well...


...there were two pieces gone before I could think to snap a picture. I do have to say that if you are looking for a one-crust apple pie this is a great recipe to start off with. Instructions are simple and clear, there are no crazy ingredients, and the resulting pie is absolutely tasty. I did not include walnuts or raisins in the pie, due to some previous disagreements about the use of raisins, but if you feel like they work for you and your family I would highly suggest adding them in. 

What is the favorite pie in your household? Let me know on Facebook or in the comments below!

Tuesday, August 16, 2016

So, about that quiche...

Sometimes it's good to remember that old saying - "You can't judge a book by it's cover." Such was the case with the quiche I made last night. You may remember me posting the teaser picture on Facebook. If not, here is the picture again. 

Finished zucchini and onion quiche.
It looked great - until I started to cut into it. It turns out that even though I had cooked it long enough, the inside was still very loose and runny. In an effort to mitigate any potential for undercooked eggs, I baked it for an additional 7 minutes longer than was suggested, but it did not do anything to help the consistency. The quiche just would simply not stay together.

This is not to say it wasn't delicious. Three zucchini and half an onion cooked up and stuck in a quiche with some sharp cheddar cheese was sufficient to make it taste fantastic. And ultimately that's what I am going for - I'm not competing on Iron Chef where I lose points for presentation. Though as I ate my dinner I thought back to what exactly made my normally perfect quiche fall apart this time. Then I remembered my prep, and how much I cooked the zucchini. Zucchini, like many fruits and vegetables, contains a surprising amount of water. When I pre-cooked the zucchini and onion, I did not cook them fully. My thought was that I didn't want them to get overcooked when they cooked again inside the quiche, but when they cooked once again inside the quiche they gave off a lot of water which threw off the balance of the custard and in fact broke it up. 

This was what my slice of quiche looked like...
Well, you live and learn. Tip to all of you that I have learned the hard way - cook your vegetables FULLY before putting them into your quiche.


Sunday, August 14, 2016

Quick tips for juicy BBQ chicken

Wow does the time fly by!

Eat a popsicle with chopsticks? Well, if you want to...
Just two years ago today my wife and I went to the hospital and welcomed our second son to the world. He is so full of personality and opinions now, and such a beautiful young boy and we are blessed to have him in our lives. So what better way to celebrate a summer baby than by having a cookout for a birthday party! It was a small event yesterday, but we all enjoyed the shade, a wading pool, a water table, and most especially central air!

One thing I made for us yesterday was barbecue chicken. This is SUCH a trap food in so many ways that some people avoid cooking it at all, because when they do they make a couple of critical mistakes. Fortunately I can give you some easy ways to get around three mistakes I see and hear often and cook juicy, tasty, and safe barbecue chicken.

Mistake 1: Undercooking your chicken.
Chicken MUST be cooked through to avoid the potential for food-borne illnesses, specifically salmonella. I have had food poisoning before (not from something I cooked, thankfully) and it was definitely not a fun experience. The first thing I will say is that your grill needs to be super-hot before you even put the chicken on the grill. Get it up to around 500 degrees or so and then add your meat to the equation. This will also help prevent the food sticking to the grill. The other is to get yourself one of these:


It is a quick-read thermometer and it is a must-have for any kitchen. You can get them in digital or analog and they are a must for cooking any kind of poultry. Make sure you get the meat to at least 165 degrees. If you want to be safe you can go to 180, but too much more than and you will get into the next mistake.

Mistake 2: Overcooking your chicken. 
I know I know - it's almost a Catch-22 with these two. You don't want to undercook the meat, but too much and it just about turns into tire rubber with sauce. The first thing to do is make sure you're not cooking pieces of chicken that are too big. Huge pieces - specifically chicken breast cuts - are just too big and can easily end up overcooked on the outside and undercooked in the middle. Cut them into smaller chunks to make sure that they can cook evenly. The second thing that you can do gives you a little more middle ground to land in. It just requires a little preparation and some very basic ingredients.

Brine cooling in the fridge.
Basic Brine:

  • 2 cups vegetable or chicken stock
  • 2 cups ice water
  • 2 TBSP Kosher Salt
  • 1 TBSP Brown sugar
  • 1/2 TSP minced garlic
  • 1/2 tsp whole black peppercorns
I include the final two ingredients, but you an leave them out, change them for something else, or even add to them to change how you want your meat to taste. Add all of the ingredients to a stockpot except the ice water and bring to a boil. Cool the brine slightly and add to the ice water. Put the brine liquid into the fridge to cool completely. Once the brine is cooled completely soak your chicken in the brine for at least an hour, more if you want to give some more flavor. One great thing about this brine is that you can use it on more than just chicken. Pork, steak, any meat you want to cook can be brined. It is a great way to add flavor and juiciness to any meat dish - grilled, broiled, or sautéed. 

Mistake 3: Burning the Sauce.
Barbecue sauce is some of the best stuff there is, and whether you make it yourself or buy it in bulk it is what makes barbecue chicken so finger-lickin' good. So why would you want to burn it to the grill or have it get all black and sticky on your chicken? Easy answer - don't. Start the chicken on the grill WITHOUT sauce and make sure the outside is cooked completely before starting to add sauce. Use that brush that came with your grill kit and dump some sauce in a bowl and slather it on. Personally I use a coffee cup because it has a great handle to help me hold the sauce while I am painting it on the chicken. 


If you can avoid these three major mistakes you will end up with some delicious and crowd-pleasing barbecue chicken at your next cookout. How do you sauce your chicken? Is it homemade, or do you have a favorite brand of BBQ sauce that you swear by? Let me know in the comments below or on Facebook!

Wednesday, August 10, 2016

S'Mores Ice Cream for National S'Mores Day

So BAMBI says to me the other day "Wednesday is National S'mores day - we should do something to celebrate!" If you haven't figured out yet, this girl has a serious chocolate thing going on.

I wasn't sure, but I checked it out. Turns out she is right - today is National S'mores Day and you are welcome to celebrate along with us! We decided that since this summer has been really kind of extra hot and sticky we would try to keep things cool, so we decided on making a S'mores sundae!

We started with vanilla ice cream - because it is the perfect platform for building most sundaes. Then we got out our s'mores ingredients, marshmallows, chocolate, and graham crackers.

I put some graham crackers in a small plastic bag and broke them up until I had some crumbs, but some larger bits as well. I also kept out some larger quarters of cracker to use as a topper for the sundae. Then I chopped up some large marshmallows - which is trickier than it sounds. The outsides of marshmallows are easy to handle, but their insides can get really sticky really quickly. One trick when cutting something that can get really sticky is to coat the knife you are using in something like non-stick cooking spray or vegetable oil to keep the sticky stuff from sticking to your knife.


After that it was a matter of adding the marshmallow to the ice cream and then sprinkling on some chocolate chips.


These sundaes turned out great - and were a super-tasty to celebrate National S'mores Day. How you celebrate today! Did you go off the beaten path like we did, or did you stay to the tried and true method of toasting marshmallows and making the sandwich yourself? Let me know in the comments below or on Facebook!


Tuesday, August 9, 2016

Macaroni and cheese with shrimp and bacon

I know, right! With a title like that, how could things go wrong? Short answer is that they couldn't. 

Recently I cooked up a super-tasty dinner that featured shells drenched in a bacon-flavored cheese sauce with super-mini shrimps thrown in. This was the truly made from scratch macaroni, and I made it like that so that I could get the bacon flavor in. Essentially what I do is make a simple cheese sauce, one that could be used for any number of applications and with a wide variety of variations. 


First thing to discuss is what is known as roux. Pronounced "roo" (like the character from Winnie the Pooh) it is a classic thickening agent used in classical French cooking made from a fat and flour in equal proportion. Typically the fat is butter, but in reality a roux can be made from any fat, and in this case is made my roux for the cheese sauce from bacon fat. Heating about 1 tbsp of bacon fat in a small saucepan until it is liquid, add 1 tbsp of plain AP flour and whisk the two together until they form a paste. This is your roux. Reduce the heat to medium low and add 1 cup of milk and once the milk is warmed add about 2 cups of shredded extra sharp cheddar cheese. Mix gently until the cheese is melted in nicely and then pour over the cooked noodles. At this point I also added the shrimp - sine they were already cooked they just needed to warm through, and they were so small it took no time at all. 

This dish was so well received by my kids, that my youngest, now nearly 2 years old, wanted to save his leftovers for later just like his big brother had. I managed to grab this picture of him doing his best to transfer his remaining dinner into a container:


He really kind of made a mess, but his heart was in the right place. Thankfully there was a little more in the pot to give to him, and I repackaged it for him after he had moved on to the next thing.

What would you put this cheese sauce on? Broccoli? Zucchini? Something entirely different? Let me know in the comments below or on Facebook!

Monday, July 25, 2016

Scratch-made Shake-and-bake

Here is a great success story in my efforts to try and get my kids to eat the food that I make. 


Most of us remember that old commercial. "It's Shake and Bake - and I helped!" Well, in my search for potential low-cost high-reward meals that my children will eat, my wife suggested we try shake and bake chicken. I certainly did not want to buy the branded box of stuff to try to avoid the high sodium count, so I decided to make my own. It was nice and easy, and once everything was cooked up was super tasty as well. 

The basic recipe is pretty simple, and if you want to change or edit any spices to your taste it is easy to do that. Here it is:

  • 2 cup panko bread crumbs
  • 1 tbsp canola oil
  • 1/2 tsp salt
  • 1/2 tsp ground pepper
  • 1/4 tsp garlic powder
  • 1/4 tsp onion powder
  • 1/4 tsp thyme
As for everything but the bread crumbs, oil and salt you can adjust to whatever your tastes are. I kept things pretty basic for the first time, but I will certainly adjust things based on what I cook alongside this. This time I made some simple brown rice and mixed in some sautéed carrot, celery, and onion - a blend also referred to as mirepoix. Once you have the mix blended up, put the mix in a large plastic bag, add the chicken one at a time, and shake! 

Once the chicken is coated, put it on a sheet pan in a 400 degree oven and cook until the internal temperature reaches 160 degrees, and then tent the chicken for a good 5-10 minutes. This will allow the chicken to continue to cook up to the 165 degree recommended temperature for chicken. As you can see from the pictures below, both my boys absolutely ate it all up. 


Will you come with me back to your childhood with this easy and tasty meal that - at least in my experience - kids really love?  I strongly recommend that you do. Let me know what you think of this classic preparation in the comments below or on Facebook!

Thursday, July 21, 2016

Tamago Gochi

Yo Adrian!
Few things inspire uneasiness in the kitchen like raw egg. We handle them like glass, we clean up after them immediately, and we never ever eat raw eggs. Unless we want to be like Rocky, then we chug 6 of them at 4:30 in the morning before going on a run through Philly. Despite the advances in pasteurization we are still concerned about food poisoning - and we should be. I myself have had it a couple of times, and I will spare you the gory details but suffice to say it was not fun. So you can imagine my discomfort when I came across a Japanese breakfast that made use of a raw egg, and why it took me a few days to get over my fear and try it.

Tamago Gochi is a classic Japanese made - in it's simplest of forms - with only three ingredients: Cooked rice, a raw egg, and soy sauce. It is also simple to prepare. Cook the rice, place about a cup of this rice in a bowl and create a crater in the middle. Crack a raw egg in the crater, and splash with soy sauce to taste. Then take your chopsticks (or fork) and stir the egg into the rice. If you want to be fancy, you can toss some sesame seeds on top. Let's take a moment to contemplate this:

My first tamago gochi

That little egg down in there looks unassuming, but is in fact the engine that makes this little dish run. Consider what happens in the step following this one: That egg is beaten into what amounts to a liquid, and then comes into contact with every side of all of those freshly-cooked rice grains. As you stir, that heat that is stored in the rice permeates the egg, allowing it to become a rich and creamy sauce that is now fully cooked and absolutely delicious. This is similar to what happens in a pasta carbonara, if you are familiar with the dish. In a carbonara the eggs are cooked by the pasta and bacon fat in the pan, and not the rice. Different cuisine, same principle.

Tamago Gochi after stirring
For those of you on the fence about this dish, I heartily suggest you hop over. Sure the grass is the same color, but the tamago gochi is steaming hot, and ready to fill your bellies in the morning. This dish will surprise you in it's humble complexity, and is a great way to start any day - or even to serve at a brunch or lunch table. The egg sauce transforms the rice from humble bland grains into flavorful fuel for your day, and the feeling of cupping the bowl in your hand and eating the rice is second to none.

Will you or won't you? Share your experiences with this my new breakfast favorite in the comments below or on Facebook!

Tuesday, July 19, 2016

Vacation blueberry corn salad

Blueberry corn salad
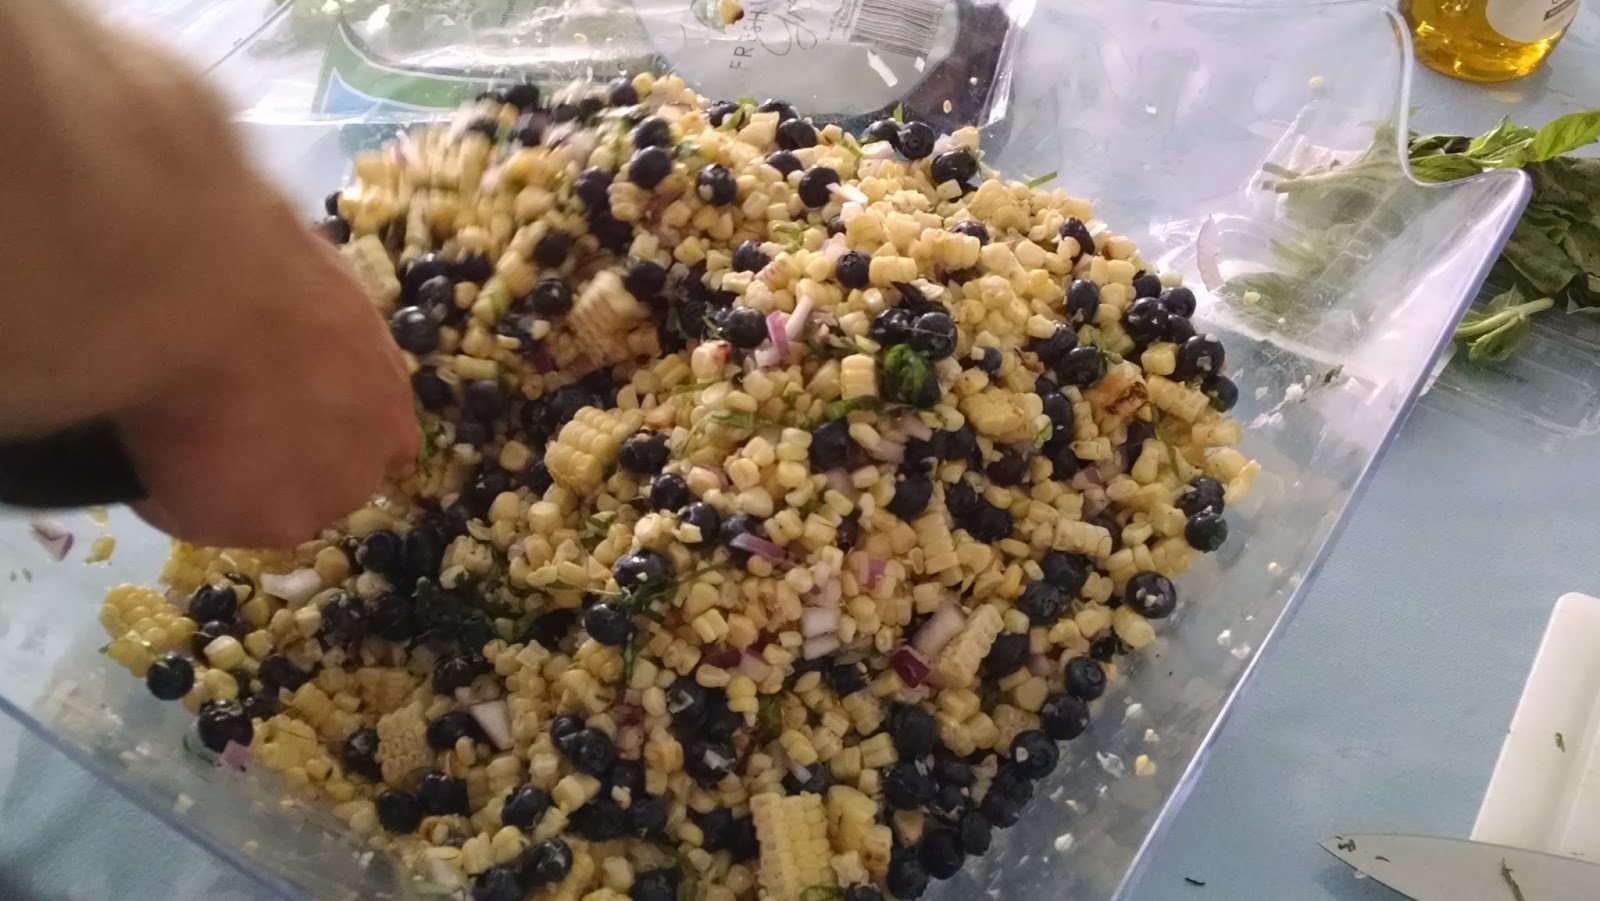
Since I was at the shore and on vacation with family I didn't have much of a chance to cook last week. While at the house all of the families take turns cooking for the days we are there, so apart from some help procuring knives I didn't have much to do in the afternoons and evenings. On the night that my family cooked, I did make one thing that I did I will share with you, and that is this blueberry corn salad that I made. It was easy to make and everyone really enjoyed it.

I will start with the basic recipe, because I expanded it by about 4 times so that I had enough to feed all of the mouths in our house:

  • 6 ears of corn
  • 1 cup fresh blueberries
  • 1/2 cup red onion (minced)
  • 1/4 cup lime juice
  • 1/4 cup olive oil
  • 6-8 leaves basil
  • 1 tbsp honey
  • salt and pepper to taste
Corn cutting technique with 2 bowlsSince I had a grill available I did grill the corn, though you could easily boil the corn if that is how you like it. This gives me the opportunity to share a great trick for getting the corn off the cob once you have it cooked and cooled enough to handle. Get a large bowl and invert a small bowl inside of it. Stand the ear of corn up on the bottom of the small bowl and slice down with a good knife. The corn will fall off into the large bowl and not go all over the place as it would if you just did it on a cutting board, and the inverted bowl keeps your hands and knife out of the large mass of corn that is already cut. It may not be super handy for one or two, but when you are cutting down 24 ears of corn like I was it is a necessary trick. 

Once you have the corn cut all that is left is some basic salad assembly. Put the cut corn, onion, and blueberries in a large bowl. Cut the basil into a chiffonade and add to the bowl. Next mix the honey, lime juice, and olive oil in a small bowl and whisk until combined, and pour over the salad to dress, and then salt and pepper to taste. 


If you're not sure about a chiffonade, it sounds fancy but is super easy. Take the basil (or mint or other large leaved herb) and make a small stack - no more than 6-8 leaves. Then take these leaves and roll them longwise into a tight roll, then run your knife through the roll. What you end up with is crosswise cuts of herb that make a great visual component to a salad, and a nice garnish too if you want to use the herb as a garnish. 

Cutting a basil chiffonade
Once you have all of that done all there is left to do is enjoy it! We served this as a salad to accompany our "seafood feast" of fresh fish and other seafood that is cooked by my family. My Dad does a wonderful job directing all of the cooking and everyone always looks forward to our meal each year. There really is nothing like fresh-caught seafood at the beach. What will you serve this salad with? Let me know in the comments below or on Facebook!

Monday, July 18, 2016

Pioneer Biscuit update

About a month ago I posted about my Pioneer Evening, where I made a pair of recipes from Ree Drummond. I loved the pot roast recipe that I got out of that, but the biscuits left definite room for improvement. Yesterday we hosted some friends for breakfast, and it seemed like the right time to give those biscuits another shot.

Well, another try was made and this time they ended up much more successful than the prior attempt. I made one change to the recipe and used a combination of bacon fat and shortening instead of butter, and I heated the oven to 425 degrees instead of 475 degrees and watched the biscuits until they were done. They did take a little bit longer to bake, but not so much longer that it would have thrown anything off. It took them about 12 minutes instead of 8-10 like the recipe says. 

The biscuits were soft and flavorful, probably owing to the majority of bacon fat that was used instead of butter. I did also sprinkle in a little thyme and some onion powder to add some additional flavor to the mix. Add these biscuits to a breakfast with scrambled eggs, hash browns, bacon, mimosas, and some fresh fruit and you definitely have yourself a winner!

Thanks for sticking it out until I had a chance to try these biscuits again - if was definitely worth the wait!


Monday, July 11, 2016

Is it really vacation if you bring your kids?

Apologies for the several-day hiatus from the blog, but I have only been doing this for a few months now and I was not sure how to get ready to really keep up a solid momentum of posts while away on vacation. However, sitting here pondering a few things - mostly revolving around my children - I really realized something. These week-long vacations are not much fun with really young kids around.

Don't get me wrong - I love my kids. But it is hard enough to get them to go to sleep at a reasonable time at home, let alone in a house with 20 other people. They want to stay up later, they try to get away with things more, they push boundaries - how kids do. It's just way more frustrating when all you want to do is go sit on the beach with a good book and relax and you have to worry about the 1-year old's diaper status and the 6-year old running off into the street because he sees his big cousins doing it and thinks he should be able to do it too. Dinners are cooked by committee and it is not always easy to find things that picky eaters will eat, so meal times can be rough. Then there is the general over-tired feeling that comes from being near the beach and playing in the sun, and we all know how fantastically well-behaved kids are when they are over-tired.


We are not going to stop coming on this trip - it is a family tradition and we would miss it terribly if we would not come, as we have some years. I would miss seeing my nieces, nephews, brother, sister, cousins, aunts, uncles, and other family members for this week-long family reunion. Our family would miss the beach, as this is about the only time we get to spend down the shore in a summer. It takes some getting used to - this whole vacation with kids thing. By the end of this week I think I will have it just about figured out - which means that next year it will be completely different all over again.

I guess that's the beach for you - the only constant is the water and change. Tides ebb and flow, sand washes in and is washed out my storms, grasses grow and dunes enlarge, and always and constant is the pounding surf. Somehow it is like having children. Children will always be there - their moods will ebb and flow, they will eat and grow larger and more capable and more independent. I guess the point I am trying to make is that no matter how hot or bothersome the sand is, no matter how many times the seagull swoops down and steals your granola bar, and no matter how many times you thought you reapplied sunscreen but still ended up burned anyway you should be thankful you have the opportunity to be at the beach.  Just as I should be thankful for the opportunity to have children. Having them a the beach and getting off of their routines and schedules is not the greatest, but watching my son play in the surf and his brother building and demolishing and then rebuilding and then re-demolishing sand castles with his older cousin is the point of it all. So I think the answer is yes - it is a vacation if you bring your kids - because bringing your kids is the point of the vacation. It's just up to the grown-ups to try and remember that from our own childhoods.

Friday, July 8, 2016

I have earned...one half portion

OK, I admit it. I have been slacking a little lately. I think the heat must be getting to me. Which is clearly no excuse if you make your living scavenging around inside the guts of a Imperial Star Destroyer for spare parts just so you can eat a meager ration. If you haven't see Star Wars Episode 7 yet (you need to get on that if you haven't) I am not going to reveal much about the plot of the movie here so no need for spoiler alert warning. One thing I found cool is that Star Wars actually released a recipe that goes along with food that is consumed by one of the characters on screen. The character Rey eats a bread ration that she makes by rehydrating a packet that is given to her by her boss. Now you too can have this bread in your own home!

(Before I give you your portion for reading this blog entry, I must give a shout out to my friend Erik Meyer who gifted me with my first portion of this bread. He has a blog too - you should go check it out at The Fine Art of Listening.)

Now - the portion bread:

  • 1/2 tsp vegetable oil
  • 4 tbsp cake flour
  • 1 1/2 tsp sugar
  • 1/2 tsp matcha powder
  • 1/4 tsp baking powder
  • 2 tbsp whole milk
  • 1/4 tsp vanilla extract
To make and distribute, mix the flour, sugar, matcha powder and baking powder and give out in small bags, and make sure to include the instructions below as well as to make sure they add the wet ingredients as well. 

To make the bread, grease a coffee mug with the oil, mix all the ingredients together in the mug and microwave on high for 45 seconds. It won't look EXACTLY like the movie, but you will get close. Now you have a snack to munch on while you watch The Force Awakens! 

You have seen it, right?

Thursday, July 7, 2016

How do you top that?

So I don't have much to say about things today, except that fruit goes great with ice cream. There you have it - no fabulous tips, no great recipe. Just restating the obvious fact that fresh fruit and ice cream were made to go together.

How do YOU fruit and ice cream? Do you specifically pick out fruits to go with the ice cream, or do you start with the fruit and then pick the ice cream? My house tends to go seasonal with the fruits, and simple with the ice creams. The picture to the left is peaches, plums, and cherries on vanilla ice cream. We don't tend to go super crazy picking out ice cream flavors and mostly stick to the basics - chocolate, vanilla, maybe some salted caramel or cookies and cream if we are feeling extra fancy.

So do you go for the creamsicle and toss some orange supremes on vanilla? Perhaps you like to go whole hog and do it up with a banana split, or maybe you like to be more playful, and top some chocolate ice cream with strawberries? Will you dare to be like me tonight and combine the chocolate ice cream with blueberries for a rich dark taste? The combinations and flavors are as endless as your imagination. What are some of the pairings you like to sit down with? Let me know in the comments below or on Facebook!

Monday, July 4, 2016

Succulent Squash Pasta Toss

I must once again thank my friend Leni for the influx of magazines. Recently BAMBI came home with 4 or 5 different magazines, and then proceeded to methodically start looking through them for recipes she wanted me to make for her. I am not sure how many she has earmarked for me, but I am sure that it will take me quite a few weeks to get through everything. I don't think I can manage a new recipe every day, and I also still need to produce meals that my kids will eat. Today's dinner recipe came from the July issue of "Cooking Light" magazine.

This Basil Squash and Tomato pasta toss was bright, full of flavor, and easy to make. I was even able to convince my oldest son to help me with some of the prep work on the dish, though I think the big attraction to that was him being allowed to hold one of my sharp knives. I will say that he did a reasonable job cutting up my summer squash for me, and stayed very safe while holding my 6" utility knife. I WAS hoping that by enlisting his help with the cutting of the ingredients I would be able to get him to taste the finished dish. While he did eat most of it, he still stayed well away from pretty much anything that was not pasta.

The thing that really made this dish good - for me - was the parmesan cheese. I normally think of parmesan cheese in something really heavy, like on a big pile of pasta with red sauce, in an alfredo with shrimp, or - perhaps my personal favorite - melted in a mushroom risotto. The thing about all of these dishes is that they are really heavy, wintry dishes. I was expecting a dish with as much parmesan as was called for to be a lot heaver than this was. The sauce was fresh and airy, the cheese added the right amount of umami to the dish, and the rest of the ingredients were light as a feather mixed in with the pasta. I will say that I used a whole box (12 ounces) of rotini pasta - rather than the 8oz that was called for in the recipe, so I used a little bit more cooking liquid and a little bit more parmesan than was in the recipe, but it all worked out well in the end.

Basil squash and tomato pasta toss paired very nicely with a shandy. 
So this was tonight's dinner - keep an eye out for more magazine-inspired dinner menus in the weeks to come. I am sure this meal will not be the last one from this latest batch of magazines. Where do you get your inspiration for new dinners? Blogs? Websites? Email newsletters from recipe sites? Let me know how you find new meals in the comments below or on Facebook!

Friday, July 1, 2016

Pita in your pocket

So recently I put together a nice light evening meal, but I'm not really sure what to call it. I was calling it "tapas" but it's not really what this was. It definitely had a theme going with it - Mediterranean flavors going on throughout - but other than that I'm not really sure what to call it. Other than delicious. I made some fresh hummus, which the boys LOVED by the way. I don't think I could have forced them to eat chickpeas by themselves, but grind them up into hummus and they were attacking their bowl with nothing but a spoon. Definite Dad dinner win on that one. Alongside the hummus we had some crudite (celery, peppers, carrots, apples) some homemade pickles, two kinds of olives, some jasmine rice, and a really nice cucumber salad that was a leftover from a dinner out. To hold all of this together I had decided to make some homemade pita bread. I searched around for a decent recipe and found one in the cooking section of New York Times' website, which can be found HERE.

I was expecting a slightly more complex dough, but it was simple enough. It reminded me of a pizza dough, though it was a little drier and had less salt and sugar than my pizza dough does. That being said, the procedure was way more complex, but definitely worth it. I ended up using my round baking stone to cook them in the oven - which worked out pretty well. The oven was hot and there was a lot of in and out, so if you're thinking of doing this on a hot summer afternoon I would suggest that you either plan to do it in the morning or the night before.

 As for creating perfectly round pitas with fantastic pockets I didn't do particularly well there either, but I really wasn't too upset about it. I kind of liked that they were a little misshapen - really gave them a homemade feeling, you know? And - let's face it - the taste and smell are the ultimate test of any food, and these passed with flying colors. Tender warm pita bread fresh from the oven and covered in hummus or carrying a bite of cucumber salad to my mouth was amazing. The only thing I will say is that I tried to follow the recipe as exactly as I was able to. It really was a lot of work to make the rounds, bake them off, and then make the next one, but if you are really wanting to get that fresh pita taste I would absolutely recommend this. My guess is that with this being the first time I did this it was a little difficult for me to get into any kind of rhythm since I was constantly looking at the directions and second-guessing myself. If I make these again, I will write another post to let you know how Pita 2 goes.

Peek-a-boo, I see you!
Speaking of hummus and all those other goodies, what is your favorite thing to eat with pita bread? Do you prefer a curry, or are you more of a falafel and salad kind of person? Let me know in the comments below or on Facebook!

Wednesday, June 29, 2016

Tip From a Professional Chef

I first need to preface this by reiterating that I am by no stretch of the imagination a professional chef. I also did not receive this tip in person. I DID read about this tip in a book, tested it in my own kitchen and found that it worked beautifully for me and I continue to use it currently.

First - let me talk about labels. We all use them, whether we are dating a container of leftovers or prepping an ingredient for later in the week. Without labels - and admittedly sometimes even with them - our pantries, cupboards, and refrigerators would be unorganized messes and we would be left opening containers to try to figure our what the heck was in this and when did it get shoved in here. So what do we use? Sometimes we have single use bags that have a labeling section, or we can write right on the bag to label it. More often we end up using some kind of tape on the lid of a jar or container - probably masking tape. Then it gets wet and we peel it off and we end up with something that looks something like this:

Sticky masking tape residue
Sure the tape residue sometimes comes off after a few washings, but until it does you are stuck with it - if you pardon the pun. And even if you do wash it off, it takes some serious elbow grease to really get it done. And this is where I segue to the tip.

I recently have read a couple of books by a food writer Michael Ruhlman. Michael is on a bit of a personal quest to understand the mind of the top cooks - the Master Chefs if you will. So he is trained at the Culinary Institute of America, and begins to shadow chefs in their kitchens looking for the "it" factor that makes a successful chef and a successful restaurant. He finds that it is partially art, partially craft (or skill), partially emotion or passion for the food. Ultimately he ends up in the kitchen of Thomas Keller, the executive chef at the French Laundry in California - one of the top restaurants in the entire country. To spare you the details Thomas DOES label all of the containers he and his staff prepare for their dinners there. However he DOES NOT use masking tape. What he DOES use is this stuff right here:

Blue painter's tape - for labeling
OK so perhaps not that exact stuff - he is able to get lime green painter's tape for his labeling, but the blue stuff looks and works just fine for me. It is as easy to use as the masking tape, the labels are easy enough to read if you use a black Sharpie, and the best part- no sticky residue! The tape comes off easy peasy and there is nothing left behind. If you were like me and are still using masking tape, I suggest you switch as soon as possible. If it is good enough for Thomas Keller, it is certainly good enough for me. 

If you are interested in reading any of Michael Ruhlman's work - and if you love food I highly suggest it - Here is a short list of my favorites: 

Tuesday, June 28, 2016

Simple Shortcut to Great Macaroni

I am all about the shortcuts - especially when I can find a good one. Tonight, I definitely found a good one for you guys.

Everyone loves some homemade macaroni and cheese. There is nothing like having that bowl of cheesy cheddary pasta. But it can be so difficult to get just right. The boxed stuff ends up being salty and they don't really taste like they have real cheese in them even when they say they do on the box. Making a cheese sauce is really the way to go, but if you're always multitasking like I am - cooking two or three things all while handling the intricate negotiations of situations like "he took my toy" and "don't lay on your little brother" - then making the sauce from scratch might not be the easiest thing to do. Enter the shortcut.


Believe it or not this can of "soup" makes a mean cheddar cheese sauce, and can be easily kicked up or customized to your liking. If you like it a little cheesier, you can simply shred in some more cheddar cheese. If you like more of a blend of cheese, it is also easy to add some swiss, gruyere, or Colby Jack with the same grater. I like to add some extra sharp cheddar, and then use spices to bring more flavors to the dish. I normally add about 1/2 tsp of paprika to my mac and cheese, along with about a 1/4 tsp of onion powder and garlic powder, and about 1/8 tsp of black pepper. This gives just enough of a flavor boost, and everyone in our home loves it.


If you are into it - or your kids are old enough to let you cook in peace - the method for making cheese sauce from scratch is not difficult. I do still do this often enough to mention, and it does leave room for greater customization. Start by melting one tbsp of butter in a small saucepan over medium low heat. When the butter is melted and starts to sizzle a little bit add one tbsp of all-purpose flour and use a whisk to mix everything together. This is known in cooking terminology as a roux and is used as a thickening agent in sauces. Add one cup of milk to your roux and stir to combine. This is where making the sauce from scratch gives you greater flexibility, as you are not limited by the canned cheese sauce and can use whatever cheese you want to make your sauce. Once the milk is warm add your desired cheeses and stir gently. After the cheese has fully melted into the sauce, mix it into your cooked pasta noodles and consume voraciously.

I know this is not the only "hack" that people use in the kitchen. What are some shortcuts you use in the kitchen? Share them with me in the comments below or on Facebook!

Sunday, June 26, 2016

Easy like Sunday Morning...

There are few things nicer than a cup of coffee and a stack of pancakes made from scratch to start the morning. Add a pat of butter and some Grade A Maple Syrup and you have yourself a breakfast feast. OK, so we didn't have bacon (shopping day is today) so there certainly was something we could have added, but not much more than that. I don't like to get pre-mixed pancake mixes, especially because making them from scratch is easy enough with the right ingredients.

The first thing to do is to make sure you have some self-rising flour on hand. This is a great mixture that can help with anything from shortcakes to pancakes to biscuits to breads. Self-rising flour is all-purpose flour with a pre-mixed portion of a chemical leavener - usually baking powder - and a little salt mixed in. It is generally available anywhere you shop. I would recommend having this flour in your pantry, since it is a great shortcut to have around and really useful for many different things. You can also find recipes to make it yourself if you feel so inclined.

Mmmmm - blueberry pancakes
Once you have the self-rising flour, mix a cup of the flour, a cup of milk, an egg and teaspoon of vanilla extract and you have yourself some pancake better. I know tastes for additional items run the gamut, so feel free to add whatever you like. In our house, we tend towards chocolate chips, blueberries, and ginger. Personally, this morning I chose all three. Made for a crowded pancake, but a tasty one. What is your favorite addition to pancakes? Share it with me in the comments below or on Facebook!

Oh, and if you're like me and now you have that song running through your head, you can listen to it below while you make your pancakes!


Saturday, June 25, 2016

Well this is bananas

 If your house is anything like mine, your kids go through phases. For a while, my 1-year old seemed to want to eat nothing but bananas. Now he has pulled back off of that and seems to want yogurt all the time. I try to offer variety, and he tends to be pretty OK about balancing his eating over the course of a week or so, but he always seems to have a "food of the week" that he wants all the time.

So this is what I end up with after the banana phase: several overripe bananas that are no good for eating anymore, but have not yet gone moldy. Not much for eating any more, so what do we do with them? we certainly could just toss them into the compost heap, but that seems like such a waste. The better thing to do with them is to make banana bread. 
I have found a great recipe for banana bread on www.allrecipes.com, and it is most definitely a keeper. Not too much added sweetness - since the bananas have already concentrated their sugars it is hardly needed - and definitely easy to put together. You can find the recipe here if you are interested. Man did the house smell fantastic while this was cooking, and it seems like if you had something you wanted to add it would be easy enough. I dropped in some cinnamon and nutmeg, but if you wanted to add some chopped walnuts or almonds it should be nice and easy too. If you like to add raisins, that would probably be easy enough as well - but I know not everyone likes to bake or eat raisins. 

Completed banana bread

What is your favorite thing to do with leftovers? Looking for suggestions or ideas and not necessarily just bananas Let me know in he comments below or in Facebook!

Friday, June 24, 2016

Cool summer corn salad

One of the tricky things for me about summertime is that it stretches me outside what I like to cook. I am really big into heavy warm rich food that warms you from top to bottom. I love that kind of stuff - but a big pot of chili is REALLY not what you want to be sitting down to on a hot summer evening. You want something light and cool, not warm and heavy. I really have to look around a lot for ideas this time of year. Fortunately, one fell into my lap recently. Or more specifically, my email inbox. Yummly.com is a recipe site I have used from time to time to get ideas or recipes, and it really has some good ones. I subscribe to their email service, and I was scrolling through it when one recipe stuck out to me, a recipe for a summer corn salad. This recipe was really simple, and I found a few ways to make it my own. 

Grilled red peppers and corn
Grilled red peppers and corn 
First things first, I grilled the corn of course. Why use canned or frozen corn when I can buy some nice local corn and hit it with some serious heat and get way more flavor? The other thing is that I added red peppers to the mix, and I grilled those up too. I did these around lunchtime, so that they had time to properly cool before being used in a cold salad. Other than that, and the fact that I used raspberry vinegar rather than apple cider vinegar I pretty much followed this recipe from yummly.com. I would say the resulting dish was very light and refreshing as well as tasty.

Completed corn salad
The grilled corn and peppers gave the salad a level of additional flavor that would not have been there had I not cooked them beforehand, and the sweetness of the cherry tomatoes and fruit vinegar accentuated the corn and peppers and onions. This is certainly a great salad for customization. The standard recipe is pretty basic, so I feel like this is a great plate where you can add a multitude of ingredients. Like a spicy salad? Add some diced fresh jalapeños for a nice kick. Want things a little sweeter? Use lemon or lime juice instead of vinegar for the acid. I added peppers, but once could certainly add a mild cheese like Monterey jack or some avocado to add a creamy component. In short this is a easy base recipe to start off from, and add or subtract or substitute to suit the palate of those who are intending to consume this dish.

Did you change this dish, or did you like it as is?  Let me know in the comments below or on Facebook!