Thursday, June 30, 2016

Hey BAMBI, Gimme S'more!

DUDE and BAMBIHi there! BAMBI here (That's "Bacon Acquiring Mama Bringing It" - hey I needed a cool acronym and quick) The DUDE is allowing me to write a post about a recent day in our home, since it was my idea and I thought it would be fun to be the one to write.

The other day I decided it was time to introduce our 6 year old to a summer and camp classic treat - S'mores! Okay, let's be honest, I was in the mood for the gooey goodness too. So, with honey graham crackers and marshmallows in the cabinet, we set off to the grocery store to purchase some chocolate.

Now, I had recently read an article on NPR's The Salt about how Millennials are idealists when it comes to what they want from food - sustainable, fair trade, organic, etc. - but research showed that it all falls apart around chocolate.

"In a survey of participants ages 18 to 35, millennials reported caring about ethical issues like environmental sustainability and social responsibility in chocolate production. But when choosing chocolate privately, these self-proclaimed ethical shoppers were all chocolate bark and no bite. (Sorry.) Most showed little preference for labels advertising ethical sourcing and instead preferred labels with ingredients they recognized — items like "chocolate" and "butter," rather than "tertiary butylhydroquinone." " 

So, of course now I couldn't just grab the Hershey's milk chocolate bars and be done with it. I had to spend something like 15 minutes in two aisles of the grocery store - (the candy aisle AND the "healthy foods" section - why don't they group all the chocolate bars in one spot? Is this point itself a flaw in the study? Guess I should actually read the full study instead of the news report.) - with a six year old poking at me trying to figure out what's taking me so long to pick a stinking bar of chocolate, as I tried to find the "best" chocolate option to match my ideals. Do you know how hard it is to stick to your ideals on a budget? Also, you have to choose between things like "Rainforest Alliance Certified" OR "Fair Trade" because the available options aren't both. 

On top of all that, the "ethical" chocolate bars are all thick and not the thinner style that works so well on a S'more. Right, S'mores, that's why I was at the store and what you're here for....

So, I came away with these. 

The Dove one is Rainforest Alliance Certified and dark chocolate for me. The milk chocolate Ghirardelli, for my son, is thin and the squares are the perfect size for s'mores, so to heck with the ideals. (See, they were right!)

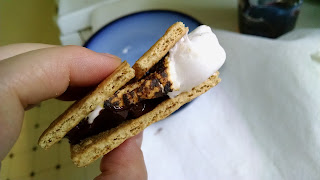
At home I forgot about ethical food, because I am making S'mores after all. Since we have no means to start a fire in our suburban backyard, I decided to toast up our marshmallows the way we toast up our tortillas - on the gas stove. As a very important safety note, I'll say that I prepped ahead by soaking our toasting sticks in water for a half hour or so, to keep them from catching fire.

Then, we went to it - break the graham crackers in half, place the chocolate, cook up the marshmallow....

Blow out the fire...

Keep toasting until it's just right and then...

YUM!

I was very impressed with 6. He was careful and respectful around the stove. And happy as a clam to make and eat his own S'mores, and a few extra marshmallows besides. I think we'll be doing this again soon!

So, how about you all - how do you make your S'mores? Or is it against your healthy-eating ethics? Share in the comments or on Facebook!


Wednesday, June 29, 2016

Tip From a Professional Chef

I first need to preface this by reiterating that I am by no stretch of the imagination a professional chef. I also did not receive this tip in person. I DID read about this tip in a book, tested it in my own kitchen and found that it worked beautifully for me and I continue to use it currently.

First - let me talk about labels. We all use them, whether we are dating a container of leftovers or prepping an ingredient for later in the week. Without labels - and admittedly sometimes even with them - our pantries, cupboards, and refrigerators would be unorganized messes and we would be left opening containers to try to figure our what the heck was in this and when did it get shoved in here. So what do we use? Sometimes we have single use bags that have a labeling section, or we can write right on the bag to label it. More often we end up using some kind of tape on the lid of a jar or container - probably masking tape. Then it gets wet and we peel it off and we end up with something that looks something like this:

Sticky masking tape residue
Sure the tape residue sometimes comes off after a few washings, but until it does you are stuck with it - if you pardon the pun. And even if you do wash it off, it takes some serious elbow grease to really get it done. And this is where I segue to the tip.

I recently have read a couple of books by a food writer Michael Ruhlman. Michael is on a bit of a personal quest to understand the mind of the top cooks - the Master Chefs if you will. So he is trained at the Culinary Institute of America, and begins to shadow chefs in their kitchens looking for the "it" factor that makes a successful chef and a successful restaurant. He finds that it is partially art, partially craft (or skill), partially emotion or passion for the food. Ultimately he ends up in the kitchen of Thomas Keller, the executive chef at the French Laundry in California - one of the top restaurants in the entire country. To spare you the details Thomas DOES label all of the containers he and his staff prepare for their dinners there. However he DOES NOT use masking tape. What he DOES use is this stuff right here:

Blue painter's tape - for labeling
OK so perhaps not that exact stuff - he is able to get lime green painter's tape for his labeling, but the blue stuff looks and works just fine for me. It is as easy to use as the masking tape, the labels are easy enough to read if you use a black Sharpie, and the best part- no sticky residue! The tape comes off easy peasy and there is nothing left behind. If you were like me and are still using masking tape, I suggest you switch as soon as possible. If it is good enough for Thomas Keller, it is certainly good enough for me. 

If you are interested in reading any of Michael Ruhlman's work - and if you love food I highly suggest it - Here is a short list of my favorites: 

Tuesday, June 28, 2016

Simple Shortcut to Great Macaroni

I am all about the shortcuts - especially when I can find a good one. Tonight, I definitely found a good one for you guys.

Everyone loves some homemade macaroni and cheese. There is nothing like having that bowl of cheesy cheddary pasta. But it can be so difficult to get just right. The boxed stuff ends up being salty and they don't really taste like they have real cheese in them even when they say they do on the box. Making a cheese sauce is really the way to go, but if you're always multitasking like I am - cooking two or three things all while handling the intricate negotiations of situations like "he took my toy" and "don't lay on your little brother" - then making the sauce from scratch might not be the easiest thing to do. Enter the shortcut.


Believe it or not this can of "soup" makes a mean cheddar cheese sauce, and can be easily kicked up or customized to your liking. If you like it a little cheesier, you can simply shred in some more cheddar cheese. If you like more of a blend of cheese, it is also easy to add some swiss, gruyere, or Colby Jack with the same grater. I like to add some extra sharp cheddar, and then use spices to bring more flavors to the dish. I normally add about 1/2 tsp of paprika to my mac and cheese, along with about a 1/4 tsp of onion powder and garlic powder, and about 1/8 tsp of black pepper. This gives just enough of a flavor boost, and everyone in our home loves it.


If you are into it - or your kids are old enough to let you cook in peace - the method for making cheese sauce from scratch is not difficult. I do still do this often enough to mention, and it does leave room for greater customization. Start by melting one tbsp of butter in a small saucepan over medium low heat. When the butter is melted and starts to sizzle a little bit add one tbsp of all-purpose flour and use a whisk to mix everything together. This is known in cooking terminology as a roux and is used as a thickening agent in sauces. Add one cup of milk to your roux and stir to combine. This is where making the sauce from scratch gives you greater flexibility, as you are not limited by the canned cheese sauce and can use whatever cheese you want to make your sauce. Once the milk is warm add your desired cheeses and stir gently. After the cheese has fully melted into the sauce, mix it into your cooked pasta noodles and consume voraciously.

I know this is not the only "hack" that people use in the kitchen. What are some shortcuts you use in the kitchen? Share them with me in the comments below or on Facebook!

Sunday, June 26, 2016

Easy like Sunday Morning...

There are few things nicer than a cup of coffee and a stack of pancakes made from scratch to start the morning. Add a pat of butter and some Grade A Maple Syrup and you have yourself a breakfast feast. OK, so we didn't have bacon (shopping day is today) so there certainly was something we could have added, but not much more than that. I don't like to get pre-mixed pancake mixes, especially because making them from scratch is easy enough with the right ingredients.

The first thing to do is to make sure you have some self-rising flour on hand. This is a great mixture that can help with anything from shortcakes to pancakes to biscuits to breads. Self-rising flour is all-purpose flour with a pre-mixed portion of a chemical leavener - usually baking powder - and a little salt mixed in. It is generally available anywhere you shop. I would recommend having this flour in your pantry, since it is a great shortcut to have around and really useful for many different things. You can also find recipes to make it yourself if you feel so inclined.

Mmmmm - blueberry pancakes
Once you have the self-rising flour, mix a cup of the flour, a cup of milk, an egg and teaspoon of vanilla extract and you have yourself some pancake better. I know tastes for additional items run the gamut, so feel free to add whatever you like. In our house, we tend towards chocolate chips, blueberries, and ginger. Personally, this morning I chose all three. Made for a crowded pancake, but a tasty one. What is your favorite addition to pancakes? Share it with me in the comments below or on Facebook!

Oh, and if you're like me and now you have that song running through your head, you can listen to it below while you make your pancakes!


Saturday, June 25, 2016

Well this is bananas

 If your house is anything like mine, your kids go through phases. For a while, my 1-year old seemed to want to eat nothing but bananas. Now he has pulled back off of that and seems to want yogurt all the time. I try to offer variety, and he tends to be pretty OK about balancing his eating over the course of a week or so, but he always seems to have a "food of the week" that he wants all the time.

So this is what I end up with after the banana phase: several overripe bananas that are no good for eating anymore, but have not yet gone moldy. Not much for eating any more, so what do we do with them? we certainly could just toss them into the compost heap, but that seems like such a waste. The better thing to do with them is to make banana bread. 
I have found a great recipe for banana bread on www.allrecipes.com, and it is most definitely a keeper. Not too much added sweetness - since the bananas have already concentrated their sugars it is hardly needed - and definitely easy to put together. You can find the recipe here if you are interested. Man did the house smell fantastic while this was cooking, and it seems like if you had something you wanted to add it would be easy enough. I dropped in some cinnamon and nutmeg, but if you wanted to add some chopped walnuts or almonds it should be nice and easy too. If you like to add raisins, that would probably be easy enough as well - but I know not everyone likes to bake or eat raisins. 

Completed banana bread

What is your favorite thing to do with leftovers? Looking for suggestions or ideas and not necessarily just bananas Let me know in he comments below or in Facebook!

Friday, June 24, 2016

Cool summer corn salad

One of the tricky things for me about summertime is that it stretches me outside what I like to cook. I am really big into heavy warm rich food that warms you from top to bottom. I love that kind of stuff - but a big pot of chili is REALLY not what you want to be sitting down to on a hot summer evening. You want something light and cool, not warm and heavy. I really have to look around a lot for ideas this time of year. Fortunately, one fell into my lap recently. Or more specifically, my email inbox. Yummly.com is a recipe site I have used from time to time to get ideas or recipes, and it really has some good ones. I subscribe to their email service, and I was scrolling through it when one recipe stuck out to me, a recipe for a summer corn salad. This recipe was really simple, and I found a few ways to make it my own. 

Grilled red peppers and corn
Grilled red peppers and corn 
First things first, I grilled the corn of course. Why use canned or frozen corn when I can buy some nice local corn and hit it with some serious heat and get way more flavor? The other thing is that I added red peppers to the mix, and I grilled those up too. I did these around lunchtime, so that they had time to properly cool before being used in a cold salad. Other than that, and the fact that I used raspberry vinegar rather than apple cider vinegar I pretty much followed this recipe from yummly.com. I would say the resulting dish was very light and refreshing as well as tasty.

Completed corn salad
The grilled corn and peppers gave the salad a level of additional flavor that would not have been there had I not cooked them beforehand, and the sweetness of the cherry tomatoes and fruit vinegar accentuated the corn and peppers and onions. This is certainly a great salad for customization. The standard recipe is pretty basic, so I feel like this is a great plate where you can add a multitude of ingredients. Like a spicy salad? Add some diced fresh jalapeños for a nice kick. Want things a little sweeter? Use lemon or lime juice instead of vinegar for the acid. I added peppers, but once could certainly add a mild cheese like Monterey jack or some avocado to add a creamy component. In short this is a easy base recipe to start off from, and add or subtract or substitute to suit the palate of those who are intending to consume this dish.

Did you change this dish, or did you like it as is?  Let me know in the comments below or on Facebook!

Thursday, June 23, 2016

Happy Birthday to me

My birthday order
My birthday order
OK, so it is not my birthday today. However, I DID receive an order today that I had placed with money that I received on my birthday, so it's the next best thing. I have become rather entranced by knives recently, I have to admit. I have been reading up on the care, maintenance, storage, and use of knives in the kitchen. I have found several great resources out there including free classes, tutorials, and other posts to help me learn exactly the right things to do when caring for knives. Firstly, let me share my birthday order.

My order only consisted of two item, but they are important items for me to have and to know how to use. The first of these is a whetstone. Whetstones are - based on my reading - one of the most effective ways to sharpen a knife. Whetstones are graded very much like sandpaper, with a grit number. The higher the number, the finer the grit. When properly used a whetstone will remove the least amount of metal from the knife while allowing the edge to be sharpened to a razor sharp edge. Lower grit whetstones can even be used to repair chipped blades and broken points before moving to a higher grit to reshape and resharpen the blade

2000/5000 grit whetstone
The second item I bought was a honing rod or honing steel. Some knife block kits come with one of these, and some do not. My knife block did not, so I had been without this tool for some time. I did not know what I was missing. When a knife is used the edge can get knocked out of line - sometimes so slightly that it is not noticeable to the naked eye. The purpose of the honing steel is to re-straighten the sharpened edge in between sharpening. Knives should only need to be sharpened once every one to two months, and edges should be hones every other day or so - depending on how often you use the knife. I would hone every day if it's a knife you use often, like a chef's knife.

8-inch honing steel
8-inch honing steel
So know you know how I am going to spending my time over the next few days. Reviewing my materials on how to sharpen and hone knives; practicing and perfecting the craft of sharpening my knives; going through every knife in my block and in my new knife roll and sharpening them all to razor quality. I don't know about you but that sounds like fun!

Free resources on knife care and skills from around the internet:


Remember to keep those fingers tucked back!

Tuesday, June 21, 2016

One of my favorite shortcut tools

One of the things I like to make up for us on summer nights is a nice salad. One easy way to make the salad look super nice is to include some really nice and thin julienned carrots. Now, I HAVE been working on my knife skills, but I am nowhere near being able to julienne that much carrot in that short a time. For this, I go to one of my little shortcut tools - the julienne peeler. This little guy just takes a pull down a carrot and BOOM! You have a nice line of nice thin julienne cut carrots. 

The trick is the little barbs
The trick is the little barbs. As the peeler cuts the slice of the carrot the barbs take the slice and cut it further into strips. These you can leave long, or cut them further and get them into nice bite sized pieces that are great for salad. This cutter is also great if you want to include carrots or some other hard vegetable, like turnip or parsnip, for a stir fry or other cooked application. They would look really nice in a soup, or as a topping/garnish for a steak or pork chop. You could even cut some potatoes and fry them up for some tiny french fries.

Salad with julienne carrot
There really is no limit to how you could use this except your imagination. How do you think you could incorporate some nice julienned vegetables into your nightly meals? Let me know on Facebook or in the comments below!

Monday, June 20, 2016

My First Grilled Cheese

So on Father's Day we had been at a few events at church that weekend, and had been able to bring home a multitude of leftovers. Owing to this, I had declared that I was not cooking on Father's Day. However, my 6-year old decided that he really wanted to have a grilled cheese. "Cook it yourself" I told him - thinking this would be the end of it. His response? "OK!"

My little sous chef
My little sous chef

So he got cooking. There was SOME help getting the cheese sliced safely, and making sure that he didn't burn himself on the stovetop, but for the most part he cooked this grilled cheese sandwich himself. He tended the cooking in the frying pan, wanted to make sure he put down his own butter, and assembled the sandwich himself.

I was rather proud. More often than not these "cook it yourself" moments just turn into some kind of resignation, and that is really what I was expecting. I was not expecting to see my little man cook himself dinner. I mentioned in a previous post about how it is important to give children more independence and confidence in the kitchen, and perhaps this guy is ready to have some more. He certainly proved it with this sandwich.

"My first grilled cheese"
Is it perfect? No. Did he eat the entire thing? Absolutely. Do I think I can get him to eat more stuff if I get him to help me cook it? I certainly hope so. If he can start to take ownership of these things - taste them along the way and see how the flavors build to the end product and something he can put on his plate and eat. 

While we are on the topic of building flavors, my nearly 2-year old has been growing ever more independent in his own way. While at dinner, he was served applesauce in a bowl. my 6-year old got down the shaker of cinnamon to put on his own, and all of a sudden there was an insistence for "min-min" from the younger boy. 

Adding "min-min" to some applesauce
As we learned, he wanted some cinnamon for his own applesauce. Not only did he want cinnamon but he wanted to shake it out for himself. He then mixed it in for himself, brought a taste to his mouth, and gave a loud happy exclamation and smiled broadly. This guy already has tons of personality, and he is starting to think like a cook already. Hopefully I can start to incorporate both of my boys into the kitchen over the years to come, and soon I can promote myself to the level of executive chef!


Sunday, June 19, 2016

One lucky DUDE

If I haven't said it before, I will say it now. I am one lucky DUDE.

Today is Fathers Day, and apart from being tucked inside one more INSANE weekend it is the day we recognize Dads all over for their contributions to our lives. These days more and more Dads are taking over the reins at home and joining the ranks of the stay at home dad, and for many of these Dads - like me - it is a conscious choice. A choice to be more involved in our children's upbringing, to experience more of those little moments of joy, and to help run the family home. I will never claim that I am perfect, but a work in progress - just like my children - and we are figuring out how to be better people and work together as a family more and more each day.

So today for Father's day, I got one of my recent dreams to come true. I am now the proud owner of a knife roll. I have often been over at a friend's house or somewhere else and really wished that I had brought one of my own knives. A good sharp knife is a cook's best friend, but unfortunately many people don't pay as much attention to these tools as they should, and I have found myself trying to cut tomatoes with a dull knife. Apart from not working very well, this is rather dangerous as well. Dull knives are more likely to slip and cut the user as a sharp knife, and the extra force required to actually make the cuts can be damaging to the food and reduce the quality of the meal you are preparing.

My new knife roll!
My new knife roll!
This knife roll will let me bring along a wide assortment of knives with me - enough to be prepared for any task set in front of me. Whether it be dicing an onion, cutting a chiffonade of basil, or cutting up the thanksgiving turkey, I will be ready with a good sharp knife.

Knife roll - with the knife flap closed.
Knife roll - with the knife flap closed. 
One of my favorite things about the knife roll is that - with the flap closed to keep the knives secure - there are several additional pockets for cards, pens, pencils, and a few other assorted items. I plan to procure a few good quality whetstones and keep them in here. Another thing that I received were the colored knife guards - which are essential for safety when storing and transporting knives in a roll such as this. I did already have a few knives that came with guards, and those are the knives in the black guards. All in all here is what is in my kit:

  • 8" Chef
  • 8" Santoku 
  • 8" Slicer
  • 6" Utility
  • 5" Santoku
  • 5" Utility
  • 3.5" Paring
Once again I am a very lucky DUDE, and if you ever want me to come hang out and cook with you, just let me know. Have knife roll - will cook!


Friday, June 17, 2016

A "Pioneer" Evening

I found myself yesterday with a large cut of meat in my hands and no idea what to do with it. I had purchased a small chuck roast with the intention of figuring out how to cook it at some point, but it was now crunch time, and I still had no recipe. On top of that, it was starting to get into the afternoon, and a chuck roast takes several hours to cook properly, so I was really running out of time. So to the internet I went. I ended up on the page for Ree Drummond, otherwise knows as "The Pioneer Woman" and a page I have pulled recipes from in the past. Today I was led there by a search for a chuck roast recipe. As it is with the meals I have cooked from there in the past, this was a success.

Pot roast in the pot
As I normally do as well, I played with the recipe a little bit. I prepped the roast, onion and carrot pretty much how it was instructed, however I didn't have the fresh herbs that were called for, so I used dried instead. It ended up being fine - the flavors came through pretty well, but the cooking liquid was less clear. I also added a couple of extra items that I like in my own pot roasts - bay leaf and a cinnamon stick. The bay leaf is pretty standard, but the cinnamon adds an extra dimension that I really enjoy. Cinnamon doesn't usually get to be a part of a nice savory dish like this, and I think it adds a certain flavor that goes well with the rest of the ingredients. I also cut my pot roast in half to try to reduce the cooking time - seared both pieces in a coated cast iron dutch oven on all sides, and then into the crockpot with vegetable stock as a cooking liquid. I cooked on high for two hours and then on low for a final hour before removing the meal to a serving plate. This meal was fantastic. The carrots were cooked perfectly, the onions were mellow and sweet, and the roast melted apart in my mouth. All of the flavors complimented each other very well, and I was very glad I had added the cinnamon to the crockpot, as it gave a fuller dimension to the flavors in the dish. 

Plated pot roast with onion and carrots
The other thing that came out of this evening was an EASY recipe for buttermilk biscuits that came out fantastic. Also from the same website, this recipe gave me a quick tip on how to make buttermilk without actually having to run out and buy some every time a recipe calls for it. I definitely suggest trying these biscuits (using self-rising flour) but to save you a bit of reading I will tell you the trick to making buttermilk on demand: add vinegar. I was floored that it was that simple. Add one Tablespoon of plain white vinegar per cup of milk in the recipe and let it sit for about 10 minutes and you have buttermilk. It blew me away. The only thing was - for me - the bottoms came out a little too firm. They weren't burned, but I think I need to drop the temperature in my oven the next time I make them by a little bit - my oven really tends to run hot. I also made the 1/3 batch of the biscuits - and I am glad that I did. I ended up with way more than I even thought I might with even a third of the recipe, and we will have biscuits for a few days. 

"Pioneer" plate for dinner
Overall this meal was a resounding success. Fantastic meat, great veggies, nice fluffy biscuits, and not a whole lot of labor involved. I absolutely suggest you try these recipes and make a nice dinner for yourself.

Thursday, June 16, 2016

Classic kid-helping cooking

Is there anything more classic than having the kids help you bake cookies in the kitchen? Probably not. I still get a little nostalgic thinking of helping my mom stir in chocolate chips into the dough, fighting with my brother and sister over who got to lick one of the hand-held mixer attachments and who got the bowl (Mom always got the spoon) and I can even see the kitchen and taste the dough.

I hope that I am helping create some of those memories now. We recently went to a family picnic, and I decided to make cookies to bring with us to share as dessert. My 6-year old wanted to help, and I was more than happy to let him. Help him mix in the chocolate chips, help him spoon out cookie dough onto trays lined with parchment paper, and let him - even though it was well past his bedtime - try one of those warm gooey treats while they were still warm from the oven.

Was my kitchen a little messier than I expected it to be? Sure, but it cleans up nice.  Were the cookies a little uneven? Probably, but they were not so much that you could tell which ones he did with a normal spoon and which ones I did with my fancy-dancy scooper. Were the cookies tasty? You betcha, and most of the more than 3 dozen we made were consumed at the picnic showing that we were not the only ones who thought so. 

This reminds me that sometimes there are things more important than just cooking, and more important than having a super-clean kitchen, though I DO like to try to put the effort in to make my kitchen very neat and orderly. It is important to get kids in the kitchen, and get them helping with cooking - and this is something I need to remember more often. Experts say that having kids help with the cooking has multiple benefits, apart from just helping them build confidence and exposing them to new foods.

This is one of my new challenges. Having kids who are picky eaters I think this may be extra important for me. I need to incorporate my kids - especially my 6-year old - into the kitchen more and more. Hopefully this will help expand his confidence, his palate, and keep him healthier as he gets into his teenage years. Hopefully he will leave my house with more cooking knowledge than I had when I left to live on my own, and he will see how cooking well can help him healthy and happy through the rest of his life. 

Tuesday, June 14, 2016

Black Bean Salad with Grilled Veggies

As we get into summer, the challenge for me is to keep things cool. My specialty dishes tend to be things that are heavy, warming, and exactly the wrong thing you want to eat on a hot summer evening. I am always looking for new ideas on tasty things I can put together that work for summer dinners. This black bean salad turned out to be one of the better ones I have tried recently. First things first, I grilled all the vegetables that it made sense to grill, and even one that turned out to NOT be a good idea. 

Plate of grilled veggies
 For the record, grilled onions sounded like a great idea. The only problem was that the execution turned out to be trickier than I initially expected it would be. One of the things about onions is that they are like ogres - they have layers. When onions are raw, these layers stick together really well for the most part. When onions are cooked these layers break apart - like when you cut onions into wedges and try to grill them as I did. The onions broke apart and ended up not as well cooked as I had hoped for, so I had to toss them into a frying pan to give them a quick cook (no oil - high heat) to get them how I had wanted them to be. I do want to try grilling onion again, but might try doing it in rings instead, or trying to hold the layers together with toothpicks.

Full mise en place for the black bean salad
Full mise en place for the black bean salad
 Once the grilled veggies had cooled somewhat I started assembly on he salad. One can of black beans, one grilled red pepper, one half of a roasted onion (finished in a frying pan), one roasted zucchini, two ears roasted corn, about half a container of cherry tomatoes (raw) and about 4 ounces of Monterey Jack cheese. I cut all the ingredients up into a small chop - about the same size as the black beans (give or take a bit) and put it all in a large serving bowl. I added some salt and pepper, some good chili powder, dried cilantro, some cumin and some smoked paprika. Then I sprinkled it with about two Tbsp of vegetable oil and lime juice. This was then set in the fridge to cool completely and allow the flavors to come together. I didn't measure the spices, I just put stuff on until it tasted good to me.

Completed black bean salad
 This salad was wonderful and versatile. It was fantastic all on it's own, it went great on some warmed tortillas (not homemade today - sorry) or with some taco-flavored beef in a bowl. It was light and flavorful and everything one could probably want on a warm summer evening.

Black bean salad in a bowl
Black bean salad on tortilla
Black bean salad on tortilla 
 So however you plate it up, make sure you grill it up first. The grilled smoky tastes of the grilled veggies really make this salad stand out among some of the other recipes I have tried in the past, and is definitely work your time and worth firing up the grill. Hey, even if you plan on cooking up some burgers and dogs or some chicken later this can always be done earlier in the day or the day before to allow those flavors to come together longer while in the fridge.

What is your favorite cool summer salad? Let me know on Facebook or in the comments below!

Monday, June 13, 2016

And so it goes


Hand in sticky hand
Sometimes this is how it is.

This past Saturday we were on our way home from my 6-year old's T-ball game. This day the snack for the team were mini-cupcakes in honor of a coach's birthday, and since they had a few extra the 1-year old got one as well. Although he ate it as well as a 1-year old can eat a cupcake - icing first of course - he ended up with crumbs down his front and all over his sticky hands. As we were nearing home, he reached up for my hand. I looked at his little hand. It was sticky with melted icing, covered with chocolate mini-cupcake crumbs. But it was reaching out for me. So I took his hand and we walked.

Hand in sticky hand.

Sometimes this is how it is.

Kids are messy, and that just comes with the territory. I am imperfect, and I was considering not taking his hand because of how sticky and messy it was. I took his hand anyway, and I am glad that I did. That's all he wanted. Not a judgement on the cleanliness of his shirt or his hands, not for me to shove my adult behaviors and norms on him. He just wanted to hold my hand and walk for a little while. This was time I was never going to get back. Those big brown eyes, that wispy blonde hair, and those tiny little hands will soon turn two, then three, then more, and this moment will not come back around for me.

Of course, as soon as we got home both of us washed hands and got ourselves wiped up, but that is not the point. I realized that he - and my 6-year old - need me to accept them just how they are. Imperfections and all. So that is my challenge now, and I and sure for the rest of my life. To accept my kids for the persons that they are, and not the persons I think they should be or want them to be. I do not expect this to be easy - in fact I KNOW it is not easy. I stumble over this point over and over again, mostly because my children are stumbling over and over again - trying to figure out who they are in this big wide world of ours. It's not my job to make them into me. That would be doing them a disservice. My job, instead, is to help them find their way to themselves. None of us know where that is, but here we are - hand in sticky hand - walking towards it anyway.

Growing back green onions

Scallions in a mason jar

This is still a bit of an experiment in progress, but I wanted to start by putting this out there now. I found an article online recently about regrowing scallions (also known as green onions) by putting them in a mason jar. I had been interested in possibly growing some in our garden this year, but since we are a little late getting our garden started I bought a bunch of them to use in the meantime. Here is a link to the article from 17apart.com.

The article stated that - if left in some water - scallions will completely regrow themselves. I like to have these on hand for garnish or for finishing a dish like a soup or salad, so I decided it was certainly worth a try. So I stuck the bunch of them in a jar with a little water, and then as I used the scallions I stuck the ends back in the jar, root side down.

I don't have a solid verdict yet, but the best plus that I have found to this so far is that the scallions stayed very fresh. If you are like me and don't tend to use a whole bunch at a time, I would definitely recommend this method of keeping scallions. You do have to watch the water level so that they don't get dry and start to wither on you, but they definitely stay very fresh.

Scallions getting some sunlight
As for them growing back, that is still a work in progress. I have noticed some fresh growth on the one bulb I cut way down, so it does seem like a complete regrow would be plausible. I will certainly keep you all updated on whether or not these regrow completely, and how their flavor is when they do grow back.

Friday, June 10, 2016

New classic combos

Today was a momentous day in our household. My 6-year old attended his final day of kindergarten today, so as a result I decided to make one of his favorite specialty pizzas for him. I also saw a "throwback" on my Facebook feed that reminded me of an absolutely tasty pizza that I had made last year that I just had to make again.

For my son, I made him macaroni and cheese pizza. Well, he only wanted half to have macaroni on it, so I was happy to oblige and cook it how he wanted. I used macaroni and cheese from a box because it was much easier to do with the kids around. I sprinkled the macaroni with a little mozzarella cheese, and then covered the remainder of the pizza with the mozzarella to make it a plain pizza.

Completed half macaroni half plain pizza
For the other pizza, I made one of my favorite brainstorm pizzas ever. My (in)famous cheeseburger pizza. About a year ago I was trying to get out of a rut with my pizza toppings. Sure peppers and onions are tasty and easy to do, but what about something TRULY diabolical? This was my lightbulb moment - when I decided to see if I could make a piece of pizza taste like a cheeseburger.

It starts with the beef
To start off with I cook up about a half pound of 80/20 ground beef until it is brown all the way through. This is seasoned with Worcestershire sauce, onion powder, kosher salt, black pepper and a hint of garlic powder.  Drain the fat and set aside to cool. The next thing I do is chop a half an onion, and then let it sit in some warm water for about a half hour or so. This pulls out some of the pungent compounds from the onion and makes it milder, especially if you aren't going to cook it until it is caramelized in a skillet.

Cheeseburger pizza in process
The next step is to form the pizza dough into the pan, spread a light layer of pizza sauce, and spread around the beef and the onion. Then add some dill pickles (drained of the brine) to the pie. For these I used my own homemade pickles, but you can certainly use store-bought if you have a favorite brand. This all gets topped with sharp yellow cheddar cheese, and then baked in the oven as normal. 

Finished cheeseburger pizza
Let me just say that eating a slice of this pizza tastes like eating a hamburger. You get the meat, the bread, the onion, the tomato, the pickle, everything. I am sure that if you wanted to you could even include mustard on the pie too - if your burger would not be complete without mustard as well. I promise you if you go to the trouble to make this pizza you will NOT be disappointed. What is the craziest thing YOU ever put on a pizza? Maybe the craziest pizza you ate while out at a restaurant? Let me know on Facebook or in the comments below!


Slapdash Salad

Last night, I did not get a post out, and I apologize. My wife was out and I was at home to do dinner and bedtime duties solo, so I was a bit busy. However, I do want to let you in on a quick and easy way to elevate pasta salads.

Grilled zucchini and red pepper
I was prepping an easy orzo salad last night with fresh mozzarella, basil - I had meant for it to be a caprese salad but the kids had eaten all of the tomatoes earlier in the week - and I was poking around for some other veggies to put into this salad. I had a little zucchini leftover from earlier in the week, and some red peppers. So to give these ingredients a little extra flavor I gave them a quick coating in olive oil and tossed them onto a hot grill.

Grilled chicken thighs
I had the grill on for the chicken I was making already, so why now? It's quick and easy and adds some great flavor to the ingredients. I quartered the pepper and put it on, and the zucchini were already cut into slices so I threw those on as they were. Normally if I cut zucchini specifically to be grilled I cut longer pieces than I had - more on the diagonal - to maximize the cooking area where I can develop those lovely grill flavors.

Finished orzo salad
Finished orzo salad
This all was finished off with a pre-made Italian salad dressing, some additional balsamic vinegar, and some chopped fresh basil. This was just something I was throwing together, and not really a recipe per se, but many of my cold pasta salads are kind of like that. What are some recipes or things you like to include in pasta salad? Let us know on Facebook or in the comments below!

Wednesday, June 8, 2016

I love it when a plan comes together

Every week - usually on or right before the weekend - I set down and look at my week and come up with a meal plan for the week. I find that it helps me stay on budget for our food expenses, since it eliminates additional trips to the grocery store, and helps keep my head from spinning too much during the week. Most recently I did this on a Sunday morning with a plate of pared down huevos rancheros.

Fuel for the planning fire
I toasted three store-bought tortillas that had been leftover for a while now, dropped some salsa and shredded cheese in them, and topped with a pair of fried eggs and some chopped scallion. Very tasty I must say, and just the thing to keep me on track as I scouted out my meals for the week.

Perfect planning preparation place!

I take into consideration what is going on with everyone as I prep for the meals. Will the meals make leftovers for lunches? Is it something the kids will eat? If the kids won't eat it what will they eat instead? Are we skipping meals at home this week for parties or other events? All of these things are important, as well as any other things that could come up. This Friday is the final day of kindergarten for my 6-year old, so I decided to plan in a macaroni and cheese covered pizza - one of his personal favorites.

Do you plan out your meals? Share your thoughts on making a meal plan in the comments section below!

Tuesday, June 7, 2016

Kitchen Creativity

Last night I decided to make a dessert for a community meal that my family and I attend regularly. The community meal is the SUPPER tomorrow at the Church of St. Martin in the Fields in Chestnut Hill, Philadelphia. The homemade meal is provided free and families are welcome. I can say from attending for several years now that this is a fabulous ministry for this church.
Supper at St Martin's
The desserts are always provided as well, and they are usually centered around a theme. The theme for this week is Chocolate, Cocoa and Mocha. I wanted to do something outside the ordinary, and as usual the idea came from my wife who suggested chocolate and chili fudge. I was not sure how I was going to accomplish this task, so I watched an episode of Iron Chef America with these two ingredients as the secret ingredient to try to get some inspiration.

After watching the show last night I woke up this morning with some fresh inspiration on methods and ingredients, so I set to work.

Bridge to the chili side
Step 1: Decide on a bridge. Chocolate and Chili are two ends of the taste spectrum - spicy hot and sweet. Often foods with both of these suffer from a "taste gap" between the two. The chocolate (sweet) hits you first, and then there is a delay in sensation, then the spicy hits. What food needs is something to fill the gap. I decided on coffee to fill the gap, but my problem is this: how do I get coffee flavor in the mix without adding too much liquid? I tackled the problem on two fronts.

Grinding the beans by hand
First I decided to infuse some coffee flavor into some evaporated milk. I coarsely ground some coffee beans with my mortar and pestle and put a 12-oz can of evaporated milk in a mason jar with the coarse beans and stuck it in the fridge for several hours. This created a creamy cold-brewed style coffee flavored evaporated milk without adding any additional liquid.

Coffee-infused evaporated milk
Second, I took some coffee and brewed it extra strong (twice as many grounds as I would normally use for the amount of liquid) and then double brewed it. This meaning that once the water had gone through the brewing process, I put the hot coffee back into the coffee maker and ran it through again. Then I took the resulting brew and put it into a small saucepan and let it simmer over a low flame for several hours, evaporating more of the water and concentrating the flavor down.

Reducing the extra-strong coffee
Then I used the evaporated milk and a little bit of the extra strong coffee to create a coffee-flavored sweetened condensed milk. I strained the evaporated milk into a clean saucepan and added 1 1/2 cups of white sugar. I made sure that the sugar was all dissolved and then brought the mixture just to a boil (without letting it boil over) and then turned the heat off under the pan and moved it off of the hot burner. I allowed this to cool completely before starting in on my next step. Fudge.

Mmmmmmm. Chocolate.
Mmmmmmm. Chocolate.
Yes - I used the good stuff. Three bars of 60% Dark Cacao (12 ounces total weight) of good quality chocolate. I gave it a rough chop and then put it in a double boiler to melt it. Once it started melting I added 14 oz (or 1 3/4 cup) of the sweetened condensed milk (equal to one can purchased) and stirred gently to combine everything. If you are not familiar with the term "double boiler" it is a metal mixing bowl placed in a small saucepan with a small amount of simmering or boiling water in it. The point of the double boiler is to gently melt the contents but not expose them to direct heat. The heat coming off of the water is more even and gentle than the direct heat in a pan, and is conducive to things like melting and tempering chocolate, emulsifying sauces (like a hollandaise sauce) and other similar culinary pursuits. 

Chopped chocolate in a double boiler

If I have learned one thing, it is that heat for heat's sake is wasted. Hot spicy foods need a surrounding cast to allow them to shine. The coffee is the bridge, but along with the chili powder and ground chipotle chili I also included a little cinnamon and coriander. Personally I prefer the smoky taste of the chipotle pepper to an uncooked (or smoked) pepper like cayenne, but that's just me. They provide a deeper depth of flavor than just making stuff hot. I probably used about 2 1/2 tsp of the chili powder, 1 1/2 tsp of the chipotle powder, 1 tsp of roasted coriander and 1/2 tsp of cinnamon. I didn't measure exactly so these are just guesses. I kept playing with it until it tasted right.

Some like it hot...
Some like it hot...
This mix went into a 8" x 8" pan lined with parchment paper, and then went into the fridge overnight. After it cooled some I took some milk, powdered sugar, a dash of vanilla extract, and some red food coloring together and put it into a bag and snipped off the corner. This gave me a kind of piping bag, and I made a fun design on the top. I used a large rubber band to hold the paper in place while the mixture set up. 

Finished and decorated and ready to set in the fridge
And to top it all off, my 6-year old came into the kitchen as I was celebrating getting the spice level just right and he wanted to know what the commotion was all about. I told him what I was working on, so I told him. He wanted to taste the chocolate, and didn't seem to mind that there would be some spicy associated with that, so I let him have a tiny taste. He loved it - and there was no one more surprised than me at this news. Not to be outdone, my nearly 2-year old also requested a taste, and he not only liked the tiny bit he had but he wanted more! So this dessert has the picky eater stamp of approval! 

If this made you hungry, feel free to come on out to the SUPPER on Wednesday June 8th at 6pm. Make sure to get in line for dessert early, because this fudge is not going to last long. Hope to see you all there!