Monday, June 6, 2016

A case of mistaken identity

My wife recently made another request of me. I don't mind these requests, because they usually end up with me making something delicious that I will enjoy too. The other day she asked if I would make zucchini bread so that she could take some with her to work as a breakfast, and I was happy to agree.

As I was baking these muffins this morning, my 6-year old yelled downstairs "I smell cookies baking!" I clarified what they were, and offered him one once they were cool. He declined - probably due to the inclusion of a vegetable in the mixture. Actually, these delights are probably closer to the cookies he smelled than the vegetable he resists eating. Perhaps his nose will overrule his brain and he will end up trying one. One can hope.

Zucchini bread muffins
Recipe for zucchini bread:

  • 3 large eggs
  • 1 cup vegetable or canola oil
  • 2 cups grated zucchini (about 2 large zucchini)
  • 1 3/4 cup sugar
  • 2 tsp vanilla extract
  • 3 cups AP flour
  • 3 tsp cinnamon
  • 1 tsp baking soda
  • 1/2 tsp baking powder
  • 1 tsp salt
  • 1/4 tsp nutmeg
mise en place for the zucchini bread
mise en place for the zucchini bread
Start by whisking the eggs in a large bowl, then add in the oil, sugar, vanilla, and zucchini. Make sure the zucchini is pressed down into whatever you are using to measure it, so that you can be sure to maximize the amount of the vegetable you are able to get into the mix. You don't have to really pack it in, but tamp it down to make sure you have the correct amount.

Shredded zucchini in mixing bowl

In a separate bowl, combine the flour, cinnamon, nutmeg, baking soda, baking powder, and salt by mixing together with a whisk or fork until the ingredients are evenly mixed. Slowly add the dry ingredients to the wet ingredients in 4 installments, mixing well between each. This way you can make sure that the batter is evenly mixed and will bake up properly. 

Finished zucchini bread batter
Now you have a decision to make: what size are these finished treats going to be? With this recipe you have multiple options:

  1. Two regular loaves
  2. Six mini loaves
  3. Twenty-four regular muffins
The awesome thing is that you are able to pick and choose a little bit. For example, today I chose to make 12 regular muffins and 3 mini-loaves. I could have chosen one regular loaf and 3 mini loaves, or one loaf and 12 muffins. All are reasonable options. I just felt like this choice have me the greatest flexibility on what to do with the final products. With the oven set at 350 degrees, the baking time is about 18 minutes for muffins, 25 minutes for mini-loaves, and about 35 minutes for a full loaf. 


So if you are looking to make some tasty breakfast - or any time treats really - give these beauties a try. I just hope I leave enough of them for my wife to take with her tomorrow...

Sunday, June 5, 2016

Early Morning Pickling

This morning I woke up very early. The cat was puking on the carpet outside my bedroom, and there were about 10 million songbirds singing at their peak volume right outside my window. OK, so it probably wasn't 10 million, but it sure sounded like it. Like it or not, my day began at 5:30am today.

So I came downstairs and began to putter around in my kitchen - like I do. I washed some dishes, put some other dishes away, emptied the clean dishwasher, and poured myself some cold-brewed coffee, and started thinking about things. I had bought the stuff to make some pickles recently, so that is what I found myself doing.

Mise en place for dill pickles
Mise en place for dill pickles
I make a style of pickle called refrigerator pickles. They are simple to make, and come together in a jiffy. They won't last at room temperature, since they are not canned (or jarred) hot, but they keep a reasonable time in the fridge, and this recipe doesn't make a ton of them. Besides, once you taste them, they won't last long I promise you.

I use the small hot house cucumbers that you can get this time of year, rather than the big long ones. These cut up into smaller medallions, and the seeds are not as large so you don't get too many of them hanging around. If you want to cut the pickles into spears, you may want to consider using one of the larger varieties of cucumber. Overall you want about a pound of cucumbers for this recipe.

The recipe for the brine is pretty simple:

  • 2 1/2 cups water
  • 1/3 cup white vinegar
  • 1 1/2 tbsp kosher salt
  • 1/2 tsp onion powder
  • 1/2 tsp dried dill
  • 2 tbsp whole peppercorn
  • 1 tbsp minced / 1 clove garlic
  • 1/4 tsp sugar
Mix all the brine ingredients in a small saucepan and heat until the liquid comes to a boil, then turn the heat off and cover. While the brine is cooling, cut your cucumber and place into the jars you will be using. These jars should be sanitized, either using the dishwasher or by placing them in a pot of boiling water for about 30 seconds. Either way works just fine.

Pre-brine cucumbers
Pre-brine cucumbers
 Pour the (now only warm) brine over the cucumbers until they are completely covered. If you come up short on your liquid by a little bit, you can add just a little more water - it won't throw off the brine very much at all. Place these jars in the fridge for at least 3 days to allow the pickling to do its magic, and then enjoy them with reckless abandon. 
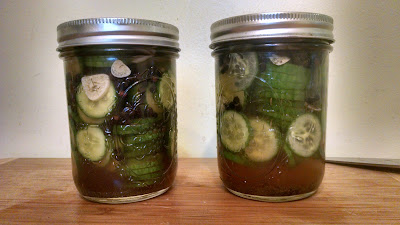
Pickles ready to go into the fridge

The pickles should keep about 3 weeks in the fridge, but ours usually don't last that long. They are fresh, have no crazy ingredients or dyes, and are absolutely the best pickles you will have. You can also play with the recipe and the look of the brines a little bit. This time I threw in a little bit of dried thyme into the brine as well, and instead of mincing the garlic I sliced it thin giving me those tasty looking garlic pieces that you can see in the photo above. I am looking forward to seeing how those taste once they have been pickled too! 

Saturday, June 4, 2016

How to get some more dough

As may remember from a previous post, I make pizza on Friday nights at our house. I make it entirely from scratch, dough and all - because it is the most cost-effective pizza I have found, and it is pretty darn tasty. Not to mention it's easy!

Here is the basic pizza dough recipe:

  • 3 1/2 cups AP flour
  • 2 1/4 tsp yeast (or one packet)
  • 2 tsp kosher salt
  • 1 tsp sugar
  • 2 tbsp Olive Oil
  • 1 1/2 cups water (warm, about 110 degrees)
Mix all of these ingredients together in a bowl using a wooden spoon or a mixer with a dough hook attachment. The dough should be moist, but not too sticky. If you see the dough is too wet, add some more AP flour a tbsp at a time. If the dough is too dry, add some more water, a tbsp at a time. When finished, the dough should look like this:

Pizza dough before it rises.
Cover the dough with a towel and let stand for at least one hour in a warm area. 


Risen pizza dough
Risen pizza dough
When the dough has risen, remove the towel and dust a cutting board or other smooth surface with some flour, and knead the dough a little bit. 


Divide the dough into two equal portions, and knead them into round balls. Spread these balls onto greased or oiled pizza pans and mold into the pizza shape. You can also press them into squares or rectangles if you don't have any round pans. 

Dividing the pizza dough
Toppings. What can I say about toppings, except that I just kind of use whatever I have around. Peppers, onions, chicken, sausage, olives, broccoli, cauliflower, and roasted garlic are just some of the toppings I have used recently. I always make one plain pizza for the kids, and one with toppings for the parents. Tonight's parent's pizza was onions and red peppers.

Onion and Pepper Pizza pre-cook
I put my oven at 450 degrees for the pizza cook, and position my racks one at the bottom and one in the middle. I start the pizzas on the bottom rack for about 6 minutes and them move them up onto the top rack for about another 5-6 minutes, or until the cheese has melted and started to brown slightly. The time on the bottom rack crisps the bottom crust and prevents sticking, and the move to the center of the oven prevents overcooking. If you like your crust a little crispier, let it stay on the bottom rack a little longer.

Completed Onion and Pepper Pizza
I do tweak the recipe a little bit - as I normally do. I will use vegetable broth instead of water when I have it available to give the dough more flavor. I also will mix in Italian seasonings with the dough (basil, marjoram, oregano, thyme, garlic) to give it an additional flavor boost.