Tuesday, August 16, 2016

So, about that quiche...

Sometimes it's good to remember that old saying - "You can't judge a book by it's cover." Such was the case with the quiche I made last night. You may remember me posting the teaser picture on Facebook. If not, here is the picture again. 

Finished zucchini and onion quiche.
It looked great - until I started to cut into it. It turns out that even though I had cooked it long enough, the inside was still very loose and runny. In an effort to mitigate any potential for undercooked eggs, I baked it for an additional 7 minutes longer than was suggested, but it did not do anything to help the consistency. The quiche just would simply not stay together.

This is not to say it wasn't delicious. Three zucchini and half an onion cooked up and stuck in a quiche with some sharp cheddar cheese was sufficient to make it taste fantastic. And ultimately that's what I am going for - I'm not competing on Iron Chef where I lose points for presentation. Though as I ate my dinner I thought back to what exactly made my normally perfect quiche fall apart this time. Then I remembered my prep, and how much I cooked the zucchini. Zucchini, like many fruits and vegetables, contains a surprising amount of water. When I pre-cooked the zucchini and onion, I did not cook them fully. My thought was that I didn't want them to get overcooked when they cooked again inside the quiche, but when they cooked once again inside the quiche they gave off a lot of water which threw off the balance of the custard and in fact broke it up. 

This was what my slice of quiche looked like...
Well, you live and learn. Tip to all of you that I have learned the hard way - cook your vegetables FULLY before putting them into your quiche.


Sunday, August 14, 2016

Quick tips for juicy BBQ chicken

Wow does the time fly by!

Eat a popsicle with chopsticks? Well, if you want to...
Just two years ago today my wife and I went to the hospital and welcomed our second son to the world. He is so full of personality and opinions now, and such a beautiful young boy and we are blessed to have him in our lives. So what better way to celebrate a summer baby than by having a cookout for a birthday party! It was a small event yesterday, but we all enjoyed the shade, a wading pool, a water table, and most especially central air!

One thing I made for us yesterday was barbecue chicken. This is SUCH a trap food in so many ways that some people avoid cooking it at all, because when they do they make a couple of critical mistakes. Fortunately I can give you some easy ways to get around three mistakes I see and hear often and cook juicy, tasty, and safe barbecue chicken.

Mistake 1: Undercooking your chicken.
Chicken MUST be cooked through to avoid the potential for food-borne illnesses, specifically salmonella. I have had food poisoning before (not from something I cooked, thankfully) and it was definitely not a fun experience. The first thing I will say is that your grill needs to be super-hot before you even put the chicken on the grill. Get it up to around 500 degrees or so and then add your meat to the equation. This will also help prevent the food sticking to the grill. The other is to get yourself one of these:


It is a quick-read thermometer and it is a must-have for any kitchen. You can get them in digital or analog and they are a must for cooking any kind of poultry. Make sure you get the meat to at least 165 degrees. If you want to be safe you can go to 180, but too much more than and you will get into the next mistake.

Mistake 2: Overcooking your chicken. 
I know I know - it's almost a Catch-22 with these two. You don't want to undercook the meat, but too much and it just about turns into tire rubber with sauce. The first thing to do is make sure you're not cooking pieces of chicken that are too big. Huge pieces - specifically chicken breast cuts - are just too big and can easily end up overcooked on the outside and undercooked in the middle. Cut them into smaller chunks to make sure that they can cook evenly. The second thing that you can do gives you a little more middle ground to land in. It just requires a little preparation and some very basic ingredients.

Brine cooling in the fridge.
Basic Brine:

  • 2 cups vegetable or chicken stock
  • 2 cups ice water
  • 2 TBSP Kosher Salt
  • 1 TBSP Brown sugar
  • 1/2 TSP minced garlic
  • 1/2 tsp whole black peppercorns
I include the final two ingredients, but you an leave them out, change them for something else, or even add to them to change how you want your meat to taste. Add all of the ingredients to a stockpot except the ice water and bring to a boil. Cool the brine slightly and add to the ice water. Put the brine liquid into the fridge to cool completely. Once the brine is cooled completely soak your chicken in the brine for at least an hour, more if you want to give some more flavor. One great thing about this brine is that you can use it on more than just chicken. Pork, steak, any meat you want to cook can be brined. It is a great way to add flavor and juiciness to any meat dish - grilled, broiled, or sautéed. 

Mistake 3: Burning the Sauce.
Barbecue sauce is some of the best stuff there is, and whether you make it yourself or buy it in bulk it is what makes barbecue chicken so finger-lickin' good. So why would you want to burn it to the grill or have it get all black and sticky on your chicken? Easy answer - don't. Start the chicken on the grill WITHOUT sauce and make sure the outside is cooked completely before starting to add sauce. Use that brush that came with your grill kit and dump some sauce in a bowl and slather it on. Personally I use a coffee cup because it has a great handle to help me hold the sauce while I am painting it on the chicken. 


If you can avoid these three major mistakes you will end up with some delicious and crowd-pleasing barbecue chicken at your next cookout. How do you sauce your chicken? Is it homemade, or do you have a favorite brand of BBQ sauce that you swear by? Let me know in the comments below or on Facebook!

Wednesday, August 10, 2016

S'Mores Ice Cream for National S'Mores Day

So BAMBI says to me the other day "Wednesday is National S'mores day - we should do something to celebrate!" If you haven't figured out yet, this girl has a serious chocolate thing going on.

I wasn't sure, but I checked it out. Turns out she is right - today is National S'mores Day and you are welcome to celebrate along with us! We decided that since this summer has been really kind of extra hot and sticky we would try to keep things cool, so we decided on making a S'mores sundae!

We started with vanilla ice cream - because it is the perfect platform for building most sundaes. Then we got out our s'mores ingredients, marshmallows, chocolate, and graham crackers.

I put some graham crackers in a small plastic bag and broke them up until I had some crumbs, but some larger bits as well. I also kept out some larger quarters of cracker to use as a topper for the sundae. Then I chopped up some large marshmallows - which is trickier than it sounds. The outsides of marshmallows are easy to handle, but their insides can get really sticky really quickly. One trick when cutting something that can get really sticky is to coat the knife you are using in something like non-stick cooking spray or vegetable oil to keep the sticky stuff from sticking to your knife.


After that it was a matter of adding the marshmallow to the ice cream and then sprinkling on some chocolate chips.


These sundaes turned out great - and were a super-tasty to celebrate National S'mores Day. How you celebrate today! Did you go off the beaten path like we did, or did you stay to the tried and true method of toasting marshmallows and making the sandwich yourself? Let me know in the comments below or on Facebook!


Tuesday, August 9, 2016

Macaroni and cheese with shrimp and bacon

I know, right! With a title like that, how could things go wrong? Short answer is that they couldn't. 

Recently I cooked up a super-tasty dinner that featured shells drenched in a bacon-flavored cheese sauce with super-mini shrimps thrown in. This was the truly made from scratch macaroni, and I made it like that so that I could get the bacon flavor in. Essentially what I do is make a simple cheese sauce, one that could be used for any number of applications and with a wide variety of variations. 


First thing to discuss is what is known as roux. Pronounced "roo" (like the character from Winnie the Pooh) it is a classic thickening agent used in classical French cooking made from a fat and flour in equal proportion. Typically the fat is butter, but in reality a roux can be made from any fat, and in this case is made my roux for the cheese sauce from bacon fat. Heating about 1 tbsp of bacon fat in a small saucepan until it is liquid, add 1 tbsp of plain AP flour and whisk the two together until they form a paste. This is your roux. Reduce the heat to medium low and add 1 cup of milk and once the milk is warmed add about 2 cups of shredded extra sharp cheddar cheese. Mix gently until the cheese is melted in nicely and then pour over the cooked noodles. At this point I also added the shrimp - sine they were already cooked they just needed to warm through, and they were so small it took no time at all. 

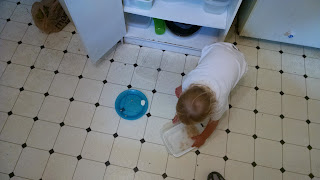
This dish was so well received by my kids, that my youngest, now nearly 2 years old, wanted to save his leftovers for later just like his big brother had. I managed to grab this picture of him doing his best to transfer his remaining dinner into a container:


He really kind of made a mess, but his heart was in the right place. Thankfully there was a little more in the pot to give to him, and I repackaged it for him after he had moved on to the next thing.

What would you put this cheese sauce on? Broccoli? Zucchini? Something entirely different? Let me know in the comments below or on Facebook!

Monday, August 8, 2016

Baking Banana Bread with BAMBI

Hello!

This evening, BAMBI and I decided that we would spend some time together in the kitchen baking. She has recently liked being able to take muffins to work with her in the morning, and we had baked some of my banana bread last week and it worked out rather well. So well in fact that our nearly 2 year old has taken to requesting "bee-ahh bed peez" which in his lingo means "banana bread please". 

Molasses and white sugar subbing in for brown sugar
One thing that I realized, a little too late, is that we were out of the required brown sugar. However, this DUDE doesn't panic. I knew that I had some molasses up in the cabinet, and armed with the knowledge that brown sugar is simply white sugar with molasses added (or remaining - depending on the quality you purchase) that is what I did. I measured almost all of the required amount of brown sugar, and then filled the rest of the vessel with molasses. Trust me - you would not notice the difference in the final product. The one thing about adding the molasses this way is that if you really like that molasses flavor, then you can just "accidentally" go a little overboard with the molasses here. 

First let's get the recipe out there:

  • 2 cups AP flour
  • 1 tsp baking soda
  • 1/4 tsp salt
  • 1/2 cup unsalted butter (one stick) - softened
  • 3/4 cup brown sugar
  • 2 eggs - beaten
  • 2-3 mashed overripe bananas
Preheat your oven to 350 degrees, and if you're using a loaf pan grease it up. In one bowl cream the butter and sugar together. Mix in the eggs and smashed bananas and combine thoroughly. In a separate bowl add the flour, salt, and baking soda and combine. In stages combine the dry ingredients to the wet, and mix together. 

Let me pause here to show you a picture of BAMBI mixing the bread at this point:


Do you see it yet? Wait, let me zoom in a little bit...


Are you with me on this? Not yet? Let's go in one more time...


Yes. She mixed with a spoon...in the stand mixer bowl...with the mixer sitting right there.  Poor ignored mixer. DUDE will find a way to use you soon. I promise you will get to do the pizza dough on Friday. BTW I actually bought the stand mixer FOR HER because we didn't get one as a wedding gift and she was the one who - at that time - liked to do the baking. Figures, right? 

In any case, this is the point at which you want to stop and consider additions. Chopped walnuts go in great, so would any number of other tree nuts, as long as they are small or chopped small. Mini chocolate chips also make a nice addition. BAMBI put some in because she claims to have found some article about how eating chocolate in the mornings helps to stave off the cravings later in the day. I think that's probably a bunch of hooey and she just wanted to find a reason to eat chocolate for breakfast. 

Either way this is when you start moving the batter into the cooking vessel. We placed the batter into lined muffin tins, but mini loaves work well, as does a full loaf. I will say that the more bananas you use the heavier the bread cooks and sets into whatever you cook it in, so if you are using more or larger bananas I would suggest smaller cooking units. 

Let's also discuss cooking times. 

Whole loaves will take about an hour to cook at 350 degrees. I have not cooked mini loaves with this recipe yet, but I would estimate they would take about 25-30 minutes to cook. Muffins take 13-15 minutes to finish. 

Let me just finish up by saying that this recipe is a great way to use up those last few bananas that no one wants to eat because they got too brown, or you can buy the bananas specifically for the purpose of mashing them up and making bread. Either way you go about it, it is definitely worth it. 

Finished muffins cooling off